
How To Make Your Own Custom Family T-shirts
Affiliate links – This post may contain affiliate links, which means I receive a small commission at no extra cost to you if you make a purchase using this link. Learn more on my Private Policy page.
Here’s another DIY project I did to make my own custom family t-shirts that I was able to get done without spending a lot of money.
My family is heading to Disney World! We are so excited as it’s the kid’s first time going to Disney.
I fondly remember my first time at Disney when I was about their age. It was so much fun seeing and experiencing everything. Now they get to have fun as well, just like I did.
So of course, I envisioned us all wearing Mickey Mouse T-shirts with our names on them.
I first went to see where I could get them done for a good price, without overspending on custom shirts.
Boy oh boy! The price for custom-made shirts was ridiculous! So I went on my “Google” and Pinterest search and found ways to make them for myself. I kid you not, I was surprised at how inexpensive it was to make some shirts.
I will show you how easy it is with just your own shirts purchased in your local craft supply store and items you already have on hand at home.
Have you purchased custom t-shirts before? How much did they cost? Please feel free to ask your questions or concerns below. I would be happy to help you!
“DIY custom family T-shirts does not have to cost you a lot of money to design yourself.”
Materials Needed:
- T-shirts (Gildan T-shirts from Michaels)
- Transfer sheets (Jolee’ Boutique Easy Image for Dark Fabric)
- Canva
- Excel No 1 Duty Knife
- Household Iron or Cricut Easy Press
- Hard surface to iron on (I used a wood cutting board)
- Small scissors
How to Make the T-shirts
T-shirts
Get T-shirts from your local craft store. I used Micheals because they had a great sale on cotton T-shirts at 3 for $9.99. I also purchased a Women’s Gildan V-neck T-shirt for around $5. The 4 T-shirts cost around $16. That was a great deal!
Transfer sheets
I decided to get the white transfer paper that I picked up from Joann. It was a bit cheaper than Micheals because I was able to use a 40% off coupon. It cost me $6.44 for 5 sheets. The sheets were Jolees Boutique Easy Image Transfer sheets.
FYI: Please note that there are two versions of this sheet depending on your choice of fabric color. There are transfer sheets for dark-colored fabrics and transfer sheets for light-colored fabrics. Be careful when selecting the correct sheet to make sure that it matches your T-shirt color choice.
canva Design software
I love Canva! This is my favorite design software that I use to do everything. I created the design I wanted for my shirt with this software.
You can use other design software tools (You can also create your own designs at www.joleeseasyimage.com), but this is my go-to for quick designs, and also it is available for free, or you can get the pro version.
The half Mickey mouse head design I used was from the Pro version. It also allows you to upload your own fonts, which I downloaded from a Google search. The font is called Waltograph.

Excel Duty Knife
The Excel No 1 Duty Knife is such an amazing tool. I do not have a “fancy” cutting machine like a Cricut to cut my design out, however, that did not stop me from getting my T-shirts done.
I used this handy cutting tool that I got from Walmart for $2.64 cents. This helped me to cut out the more intricate parts of the letters that were not easy to get to with the small scissors.
instructions
Step 1
The first step is to print your designs out on the transfer paper. Be careful to check that you are printing on the front part of the paper with no lines. Check the directions to make sure you have the correct printing instructions.
The recommended printer to use for these specific sheets is an inkjet printer. Therefore do not use any laserjet printers to do this project.
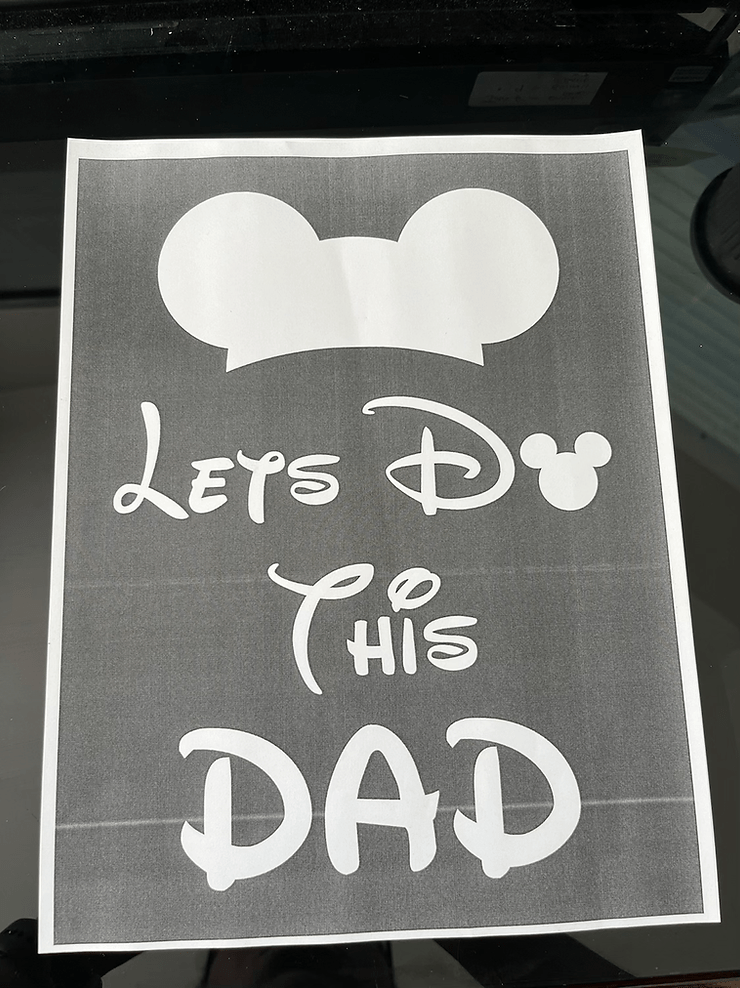
FYI: This particular sheet recommends that you DO NOT mirror or flip images prior to printing. The image goes directly on top of your shirt without mirror imaging.
Alternative: I didn’t have an inkjet jet printer at home. Therefore an alternative is to print out the design on the printer that you have available, then attach the sheet to the transfer paper. I used regular stick glue just on the corners of my paper so that I could easily cut out my letters without the paper shifting.
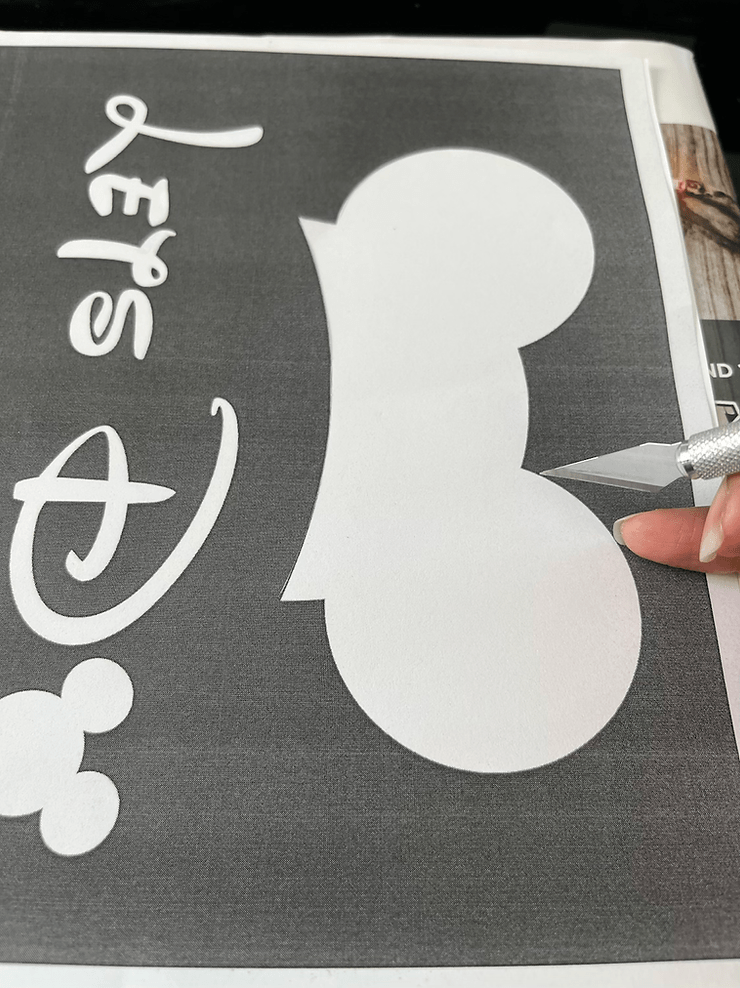
Step 2
Once have your design, cut it out using the small scissors and the excel knife for the intricate parts that the scissors cannot get to.

FYI: Be extremely careful with this knife and ensure that you are going slowly so that you don’t damage your design.
Step 3
DON’T FORGET TO peel the backing sheet off of the transfer paper before placing the image PRINT SIDE UP on the fabric.

Step 4
Place the design on your T-shirt. Use a hard flat surface. They recommend not using an iron board. I used a wooden cutting board to help me with this part.
Place the shirt on the board and then place all the letters and images that you have designed carefully on your shirt.

Step 5
Using parchment paper that was provided with the transfer sheets, place it over your design. Set your iron to the correct heat based on your fabric type. My T-shirts were cotton, so I used the cotton setting in my iron.
Make sure the steam setting is off depending on the type of iron that you have.

Step 6
Place both hands on the iron and iron over the parchment paper for the recommended 60 to 120 seconds. After completed, the transfer will adhere to your T-shirts

FYI: You can also use a Cricut Easy Press iron if you have one available. If not a regular iron works great.
Step 7
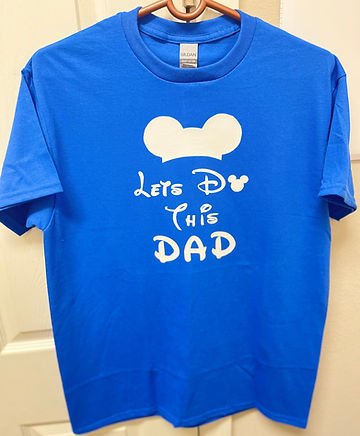
Allow it to cool and that’s it! You have made your first custom T-shirt design.
Minnie Mouse T-Shirt
I also did a Minnie Mouse t-shirt that I wore to Disney. I made a few changes to the head portion of the mouse by adding a red bow.

Materials needed to do the Minnie head
- Cricut Joy iron-on sheets (red)
- Excel No 1 Duty Knife
- Bow design from Canva image
Instructions
Step 1
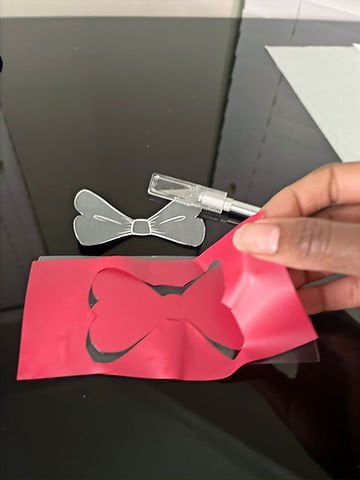
Use the image of the bow to trace a pattern out on your Cricut sheet on the back non-plastic, matte side.
Step 2
Cut the image with your excel knife. Be careful not to cut right through the front plastic sheet. Remove the remaining material from your design.
FYI: I should have just cut the entire bow out of the Cricut sheet (can use a scissors) and not leave the outer white plastic remaining. It left a little line at the end when I was ironing. However, it was not visible when I wore the shirt (thank goodness!).
Cut the entire bow out and iron with the remaining design on your shirt.
Step 3
Place the image on the T-shirt with the rest of the design. Place parchment paper over your design.

Step 4
Follow the steps above in steps 5 and 6. Iron the bow along with the remaining designs unto your T-shirt. Remove the remaining plastic backing from the bow.

Overall I do hope that this blog will inspire you to make your own unique custom family T-shirts as well.
To see my family trip to Disney wearing these custom T-shirts visit:
Did you find the strategies listed in this article helpful? What were some of your favorite tips? How have they worked for you? Leave a comment below, I’d love to know what you think.
Don’t forget to SUBSCRIBE to my email newsletter to get any NEW POSTS or Mommy Inspired FREEBIES that I have available for you, to help you on your parenting journey.
Donae
I am Donae! A wife and a mom of 2 kids, ALL boys! I would love to share with you my experience with motherhood. Let my life Inspire, Encourage and Motivate you on your journey through motherhood.


You May Also Like

Encouraging Sports In Kids

How To Start A Podcast
